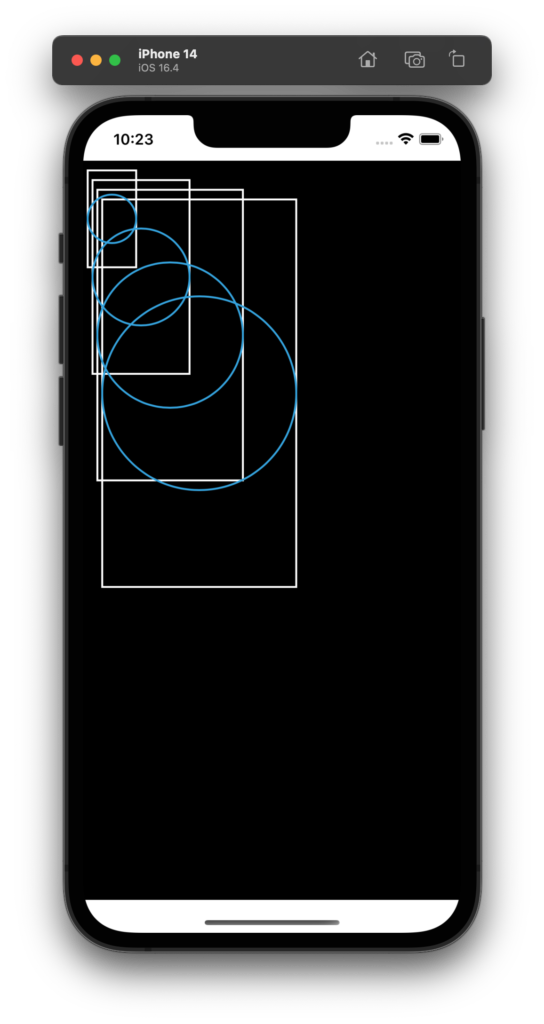
別のビューで Path の描画を定義する
ビューの中で Path は比較的複雑なコードになることが多く、これを別のビューとして定義してメインビューから呼び出すとコードの見通しがすっきりします。

メインビューの中に Path のコードを書く場合
init() で、描画したい図形の位置やサイズを決定します。
Path { } の中で矩形を描画するコードを記述します。もうひとつの Path { } の中で円を描画するコードを記述します。
なんだかコードがゴチャゴチャしておりますね。これを改善していきたいと思います。
import SwiftUI

struct ContentView: View {

    // 描画したい矩形の個数を指定する.
    let REQ_NUM_DATA = 4
    var Arr: [CGRect] = []

    let LINE_COLOR_RECT = Color.white
    let LINE_COLOR_ARC  = Color.cyan

    let LINE_WIDTH = 2.0

    init() {

        for n in 0 ..< REQ_NUM_DATA {
            let the_x = CGFloat( n + 1 ) *   5.0
            let the_y = CGFloat( n + 1 ) *  10.0
            let the_w = CGFloat( n + 1 ) *  50.0
            let the_h = CGFloat( n + 1 ) * 100.0
            let rct = CGRect( x: the_x, y: the_y, width: the_w, height: the_h )
            Arr.append( rct )
        }

    }

    var body: some View {

        ZStack {

            // 背景を塗りつぶす.
            Rectangle()
                .foregroundColor( .black )

            // 矩形を描画する.
            Path{
                path in

                for n in 0 ..< Arr.count {
                    path.addRect( Arr[n] )
                }

            }
            .stroke( LINE_COLOR_RECT, lineWidth: LINE_WIDTH )

            // 円を描画する.
            Path{
                path in

                for n in 0 ..< Arr.count {

                    let x = Arr[n].origin.x
                    let y = Arr[n].origin.y
                    let w = Arr[n].size.width
                    let h = Arr[n].size.height
                    let xc = ( x + ( w * 0.5 ))
                    let yc = ( y + ( h * 0.5 ))
                    let the_center = CGPoint( x: xc, y: yc )
                    let the_r = min( w, h ) * 0.5

                    path.addArc(
                        center: the_center,
                        radius: the_r,
                        startAngle: .degrees(  0.0),
                        endAngle:   .degrees(360.0),
                        clockwise: false
                        )

                }

            }
            .stroke( LINE_COLOR_ARC, lineWidth: LINE_WIDTH )

        }

    }
}

struct ContentView_Previews: PreviewProvider {
    static var previews: some View {
        ContentView()
    }
}
別のビューで定義したコードをメインビューからコールする場合
別のビューとして ViewPath.swift というファイルの中で ViewPathRect() と ViewPathArc() を定義して、その中で Path { } を描画します。図形の位置とサイズは引数として渡します。
別ビューの中に Path 描画コードを記述したほうが、コードの見通しが良くなることがわかると思います。
まずは下記がメインのビューのコードです。
import SwiftUI

struct ContentView: View {

    // 描画したい矩形の個数を指定する.
    let REQ_NUM_DATA = 4
    var Arr: [CGRect] = []

    let LINE_COLOR_RECT = Color.white
    let LINE_COLOR_ARC  = Color.cyan

    let LINE_WIDTH = 2.0

    init() {

        for n in 0 ..< REQ_NUM_DATA {
            let the_x = CGFloat( n + 1 ) *   5.0
            let the_y = CGFloat( n + 1 ) *  10.0
            let the_w = CGFloat( n + 1 ) *  50.0
            let the_h = CGFloat( n + 1 ) * 100.0
            let rct = CGRect( x: the_x, y: the_y, width: the_w, height: the_h )
            Arr.append( rct )
        }

    }

    var body: some View {

        ZStack {

            // 背景を塗りつぶす.
            Rectangle()
                .foregroundColor( .black )

            // 矩形を描画する.
            ViewPathRect(
                DataArray: Arr,
                LineColor: LINE_COLOR_RECT,
                LineWidth: LINE_WIDTH
                )

            // 円を描画する.
            ViewPathArc(
                DataArray: Arr,
                LineColor: LINE_COLOR_ARC,
                LineWidth: LINE_WIDTH
                )

        }

    }
}

struct ContentView_Previews: PreviewProvider {
    static var previews: some View {
        ContentView()
    }
}
下記のコードが Path の描画を記述したものです。メインのビューから呼ばれるビューです。
import SwiftUI

struct ViewPathRect: View {

    var DataArray: [CGRect]
    var LineColor: Color
    var LineWidth: CGFloat

    var body: some View {

        Path{
            path in

            for n in 0 ..< DataArray.count {
                path.addRect( DataArray[n] )
            }

        }
        .stroke( LineColor, lineWidth: LineWidth )

    }
}

struct ViewPathArc: View {

    var DataArray: [CGRect]
    var LineColor: Color
    var LineWidth: CGFloat

    var body: some View {

        Path{
            path in

            for n in 0 ..< DataArray.count {

                let x = DataArray[n].origin.x
                let y = DataArray[n].origin.y
                let w = DataArray[n].size.width
                let h = DataArray[n].size.height

                let xc = ( x + ( w * 0.5 ))
                let yc = ( y + ( h * 0.5 ))

                let the_center = CGPoint( x: xc, y: yc )
                let the_r = min( w, h ) * 0.5

                path.addArc(
                    center: the_center,
                    radius: the_r,
                    startAngle: .degrees(  0.0),
                    endAngle:   .degrees(360.0),
                    clockwise: false
                    )

            }

        }
        .stroke( LineColor, lineWidth: LineWidth )

    }
}