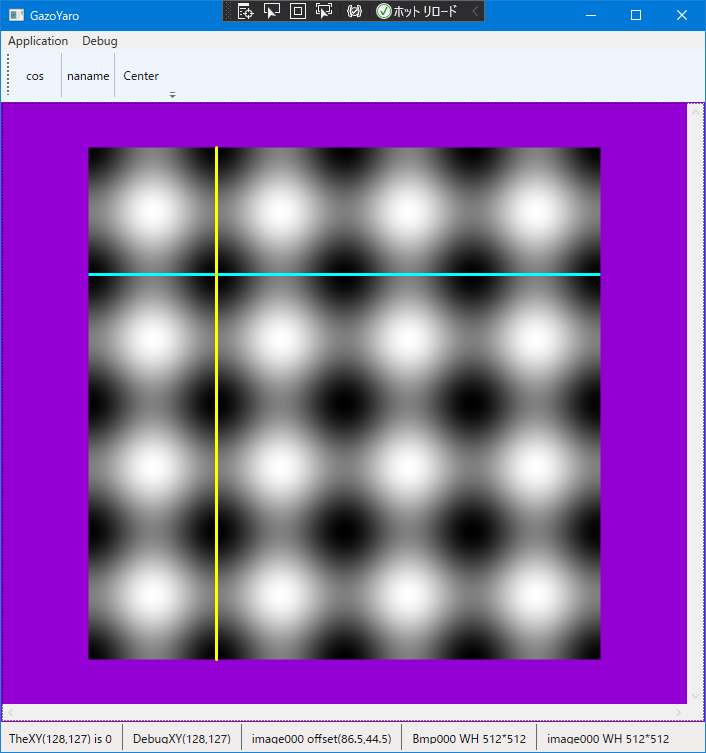
画像をクリックした場所に十字線を描画し濃度レベルを取得する
最初から別の記事をお勧めするのは恐縮ですが、まずは下記に示したのふたつの記事を読んでからのほうが本記事の内容を理解しやすいと思います。よろしくお願いします。
上記の2つの記事の方法を、ひとつにまとめ上げることで、マウスでクリックしたところに十字線をひき、かつ、その座標のデータ濃度値を参照するという画像処理ソフトらしい機能を実現することができます。下記に実行コードを示します。
<Window x:Class="aaa.MainWindow"
        xmlns="http://schemas.microsoft.com/winfx/2006/xaml/presentation"
        xmlns:x="http://schemas.microsoft.com/winfx/2006/xaml"
        xmlns:d="http://schemas.microsoft.com/expression/blend/2008"
        xmlns:mc="http://schemas.openxmlformats.org/markup-compatibility/2006"
        xmlns:local="clr-namespace:aaa"
        mc:Ignorable="d"
        Title="MainWindow"  Width="720" Height="760">

    <DockPanel>

        <Menu DockPanel.Dock="Top">

            <MenuItem x:Name="menuApplication" Header="Application">
                <MenuItem x:Name="menuApplicationQuit" Header="Quit" Click="menuApplicationQuit_Click"/>
            </MenuItem>

            <MenuItem x:Name="menuDebug" Header="Debug">
                <MenuItem x:Name="menuDebugExec000" Header="Exec000" Click="menuDebugExec000_Click" />
                <MenuItem x:Name="menuDebugExec001" Header="Exec001" Click="menuDebugExec001_Click" />
                <MenuItem x:Name="menuDebugExec002" Header="Exec002" Click="menuDebugExec002_Click" />
            </MenuItem>

        </Menu>

        <ToolBarTray DockPanel.Dock="Top">
            <ToolBar>
                <Button x:Name="tbnDebugExec000" Content="cos"    Width ="48" Height="48" Click="menuDebugExec000_Click"></Button>
                <Separator/>
                <Button x:Name="tbnDebugExec001" Content="naname" Width ="48" Height="48" Click="menuDebugExec001_Click"></Button>
                <Separator/>
                <Button x:Name="tbnDebugExec002" Content="Center" Width ="48" Height="48" Click="menuDebugExec002_Click"></Button>
            </ToolBar>
        </ToolBarTray>

        <StatusBar DockPanel.Dock="Bottom" Height="30">
            <Label Name="stbLabel000"/>
            <Separator/>
            <Label Name="stbLabel001"/>
            <Separator/>
            <Label Name="stbLabel002"/>
            <Separator/>
            <Label Name="stbLabel003"/>
            <Separator/>
            <Label Name="stbLabel004"/>
        </StatusBar>

        <Border BorderBrush="DarkViolet" BorderThickness="1" >
            <ScrollViewer Name="scv000" Background="DarkViolet" ScrollViewer.HorizontalScrollBarVisibility="Visible" ScrollViewer.VerticalScrollBarVisibility="Visible">
                <Grid x:Name="grid000" MouseDown="OnMouseDown" MouseMove="OnMouseMove">

                    <Image x:Name="image000" Stretch="Uniform"/>

                    <Canvas x:Name="canvas000" Background="Transparent">
                        <Line x:Name="cross_hair_horz" Stroke="Cyan" StrokeThickness="3" StrokeStartLineCap="Flat" StrokeEndLineCap="Flat"/>
                        <Line x:Name="cross_hair_vert" Stroke="Yellow" StrokeThickness="3" StrokeStartLineCap="Round" StrokeEndLineCap="Round"/>
                    </Canvas>

                </Grid>
            </ScrollViewer>
        </Border>

    </DockPanel>


</Window>
MainWindow.xaml.cs において、下記の名前空間の追加をお忘れなく.
using System.Windows.Media.Imaging;
using System;
using System.Collections.Generic;
using System.Linq;
using System.Text;
using System.Threading.Tasks;
using System.Windows;
using System.Windows.Controls;
using System.Windows.Data;
using System.Windows.Documents;
using System.Windows.Input;
using System.Windows.Navigation;
using System.Windows.Shapes;
using System.Windows.Media;

// これの追加を忘れないように. Don't forget tot add this sentence.
using System.Windows.Media.Imaging;

namespace aaa
{

	public partial class MainWindow : Window
	{

		const int INI_W = 512;
		const int INI_H = 512;

		const double DPI_X = 96.0;
		const double DPI_Y = 96.0;

		byte [] Data000;
		WriteableBitmap Bmp000;

		const int NUM_ELEMENT_OF_PAL = 256;

		int TheX = 0;
		int TheY = 0;
		byte TheLevel = 0;

		int DbgX = 0;
		int DbgY = 0;

		// 2次元コサインデータを格納する.
		bool get_cos_wave_data_2d( byte [] data, int width, int height, double phase )
		{

			int w = width;
			int h = height;
			int numpix = w * h;
			double [] data_a = new double[ numpix ];
			double [] data_b = new double[ numpix ];

			double rate;

			double two_pai = 2.0 * Math.PI;
			double rad;

			double value;
			double tmp;
			int adrs;

			// 水平の cos 波形2D, ( 0 から 1.0 ).
			for ( int j = 0; j < h; j++ )
			{

				rate = (double)(j)/(double)( h - 1 );
				rad = rate * two_pai;
				tmp = -( Math.Cos( phase * rad ));
				value = (( tmp + 1.0 ) * 0.5 );

				adrs = w * j;

				for ( int i = 0; i < w; i++ )
				{
					data_a[ adrs ] = value;
					adrs++;
				}

			}

			// 垂直の cos 波形2D, ( 0 から 1.0 ).
			for ( int i = 0; i < w; i++ )
			{

				rate = (double)(i)/(double)( w - 1 );
				rad = rate * two_pai;
				tmp = -( Math.Cos( phase * rad ));
				value = (( tmp + 1.0 ) * 0.5 );

				adrs = i;

				for ( int j = 0; j < h; j++ )
				{
					data_b[ adrs ] = value;
					adrs += w;
				}

			}

			// 水平と垂直を加算して 0 .. 255 の 8bits にあわせこむ.
			for ( int n = 0; n < numpix; n++ )
			{
				double a = data_a[n] * 127.0;
				double b = data_b[n] * 128.0;
				byte level = (byte)( Math.Round( a + b ));
				data[n] = level;
			}

			return true;

		}

		// ななめウロコデータを格納する.
		bool get_uroko_data( byte [] data, int width, int height )
		{

			int w = width;
			int h = height;
			byte level;

			for ( int j = 0; j < h; j++ )
			{
				for ( int i = 0; i < w; i++ )
				{
					level = (byte)( i + j );
					data[ i + w  * j ] = level;
				}
			}

			return true;

		}

		//////////////////////////////////////////////////////////
		//////////////////////////////////////////////////////////
		//////////////////////////////////////////////////////////

		public MainWindow()
		{

			// これはデフォルトのコード.
			InitializeComponent();

			// データ領域を確保する.
			int w = INI_W;
			int h = INI_H;
			int numpix = w * h;
			Data000 = new byte[ numpix ];

			// 確保した領域にデータを仕込む.
			get_uroko_data( Data000, w, h );

			// 8bppのビットマップを作るので256要素カラーパレットを作る.
			List<Color> list_color = new List<Color>(0);
			for ( int k = 0; k < NUM_ELEMENT_OF_PAL; k++ )
			{
				const byte LEVEL_ALPHA = 0xff;
				byte value = ( byte )(k);
				list_color.Add( Color.FromArgb( LEVEL_ALPHA, value, value, value ) );
			}

			// 8bppのビットマップを生成する.
			PixelFormat pixfmt = PixelFormats.Indexed8;
			BitmapPalette palette = new BitmapPalette( list_color );
			Bmp000 = new WriteableBitmap( w, h, DPI_X, DPI_Y, pixfmt, palette );

			// 画像出力先のサイズを決定する.
			image000.Width = Bmp000.PixelWidth;
			image000.Height = Bmp000.PixelHeight;

			// 画像出力先にビットマップを関係づける.
			image000.Source = Bmp000;

			// とりあえず画像の真ん中に十字線を表示する.
			TheX = w >> 1;
			TheY = h >> 1;

			// ウインドウのタイトル.
			this.Title = "GazoYaro";

		}

		protected override void OnRender( DrawingContext dc )
		{

			// 画像のサイズを取得する.
			int w = Bmp000.PixelWidth;
			int h = Bmp000.PixelHeight;

			// ビットマップに画像データを書き込む.
			Int32Rect rct = new Int32Rect( 0, 0, w, h );
			int stride_bytes = w * sizeof( byte );
			int offset_bytes = 0;
			Bmp000.WritePixels( rct, Data000, stride_bytes, offset_bytes );

			// クリックした座標のデータ濃度値を取得する.
			int adrs = ( TheX + ( w * TheY ));
			TheLevel = Data000[ adrs ];

			// ------------------------------------------
			// ここからが描画のためのコード.-------------
			// ------------------------------------------

			// 親要素 Grid000 の座標系から image000 のオフセット量を取得する.
			Point img_point = image000.TranslatePoint( new Point( 0, 0 ), grid000 );
			double plot_offset_x = img_point.X;
			double plot_offset_y = img_point.Y;

			// Canvas の座標系は Grid の座標系と同じ.
			double plot_x = (double)( TheX + plot_offset_x );
			double plot_y = (double)( TheY + plot_offset_y );

			// 出力コントロール image000 のサイズを取得する.
			double img_w = image000.Width;
			double img_h = image000.Height;

			// 水平線を引く.
			cross_hair_vert.X1 = plot_x;
			cross_hair_vert.Y1 = plot_offset_y;
			cross_hair_vert.X2 = plot_x;
			cross_hair_vert.Y2 = plot_offset_y + img_h;

			// 垂直線を引く.
			cross_hair_horz.X1 = plot_offset_x;
			cross_hair_horz.Y1 = plot_y;
			cross_hair_horz.X2 = plot_offset_x + img_w;
			cross_hair_horz.Y2 = plot_y;

			// ステータスバーのラベルに座標を表示する.
			String str000 = String.Format( "TheXY({0},{1}) is {2}", TheX, TheY, TheLevel );
			String str001 = String.Format( "DebugXY({0},{1})", DbgX, DbgY );
			String str002 = String.Format( "image000 offset({0:f1},{1:f1})", plot_offset_x, plot_offset_y );
			String str003 = String.Format( "Bmp000 WH {0}*{1}", ( Bmp000.PixelWidth ), ( Bmp000.PixelHeight ));
			String str004 = String.Format( "image000 WH {0}*{1}", img_w, img_h );
			stbLabel000.Content = str000;
			stbLabel001.Content = str001;
			stbLabel002.Content = str002;
			stbLabel003.Content = str003;
			stbLabel004.Content = str004;

		}

		private void OnMouseDown(object sender, MouseEventArgs e)
		{

			// 画像のサイズを取得する.
			int w = (int)( Math.Round( image000.Width ) );
			int h = (int)( Math.Round( image000.Height ) );

			// 親要素 Grid000 の座標系から image000 のオフセット量を取得する.
			Point pnt = e.GetPosition( image000 );

			// デバッグ監視用の変数にいったん入れる.
			// image000 以外の場所をクリックした場合を監視したい.
			DbgX = (int)( Math.Round( pnt.X ) );
			DbgY = (int)( Math.Round( pnt.Y ) );

			int tmp_x = DbgX;
			int tmp_y = DbgY;

			// クリックした座標が画像からはみ出ないようにする.
			if ( tmp_x < 0 ) { tmp_x = 0; }
			if ( tmp_y < 0 ) { tmp_y = 0; }
			if ( tmp_x >= w ) { tmp_x = w - 1; }
			if ( tmp_y >= h ) { tmp_y = h - 1; }

			// ここで代入される値は画像領域の内側であることが保証される.
			TheX = tmp_x;
			TheY = tmp_y;

			// 再描画をうながす、OnRender() が呼ばれる.
			this.InvalidateVisual();

		}

		private void OnMouseMove(object sender, MouseEventArgs e)
		{

			// 左ボタンが押し下げられているかどうか.
			if (( e.LeftButton & MouseButtonState.Pressed ) == MouseButtonState.Pressed )
			{
				// 押し下げられていたら OnMouseDown を実行する.
				this.OnMouseDown( sender, e );
			}

		}

		private void menuDebugExec000_Click( object sender, RoutedEventArgs e )
		{

			// 確保した領域に2次元コサインデータを仕込む.
			int w = Bmp000.PixelWidth;
			int h = Bmp000.PixelHeight;
			double phase = 4.0; // 4周期ぶん.
			get_cos_wave_data_2d( Data000, w, h, phase );

			// 再描画をうながす、OnRender() が呼ばれる.
			this.InvalidateVisual();

		}

		private void menuDebugExec001_Click( object sender, RoutedEventArgs e )
		{

			// 確保した領域に斜めウロコデータを仕込む.
			int w = Bmp000.PixelWidth;
			int h = Bmp000.PixelHeight;
			get_uroko_data( Data000, w, h );

			// 再描画をうながす、OnRender() が呼ばれる.
			this.InvalidateVisual();

		}

		private void menuDebugExec002_Click( object sender, RoutedEventArgs e )
		{

			int w = Bmp000.PixelWidth;
			int h = Bmp000.PixelHeight;

			// 画面のセンターを指定する.
			TheX = w >> 1;
			TheY = h >> 1;

			// 再描画をうながす、OnRender() が呼ばれる.
			this.InvalidateVisual();

		}

		private void menuApplicationQuit_Click( object sender, RoutedEventArgs e )
		{
			// ウインドウを閉じてアプリケーションを終了する.
			this.Close();
		}

	}
}
サンプルソースを用意しました。上記のコードのコピーペーストでうまく動かない場合にご利用ください。
画像のデータは、X座標とY座標を加算したものを byte にキャストして格納してあります。
( 0, 0 ) では濃度レベル 0
( 1, 0 ) では濃度レベル 1
( 0, 1 ) でも濃度レベル 1
( 127, 127 ) では濃度レベル 254
( 128, 127 ) では濃度レベル 255
( 128, 128 ) では 256 になるが byte にキャストして、濃度レベル 0
( 129, 128 ) では 257 になるが byte にキャストして、濃度レベル 1
( 128, 129 ) でも 257 になるが byte にキャストして、濃度レベル 1
になります。マウスでいろいろな場所をクリックしてご確認ください。
MainWindow.xaml.cs の 196, 197行目がクリックした座標のデータ濃度を参照しているところです。OnRender() の中でデータ参照を実施することで、データのリアルタイム更新に対応できます。
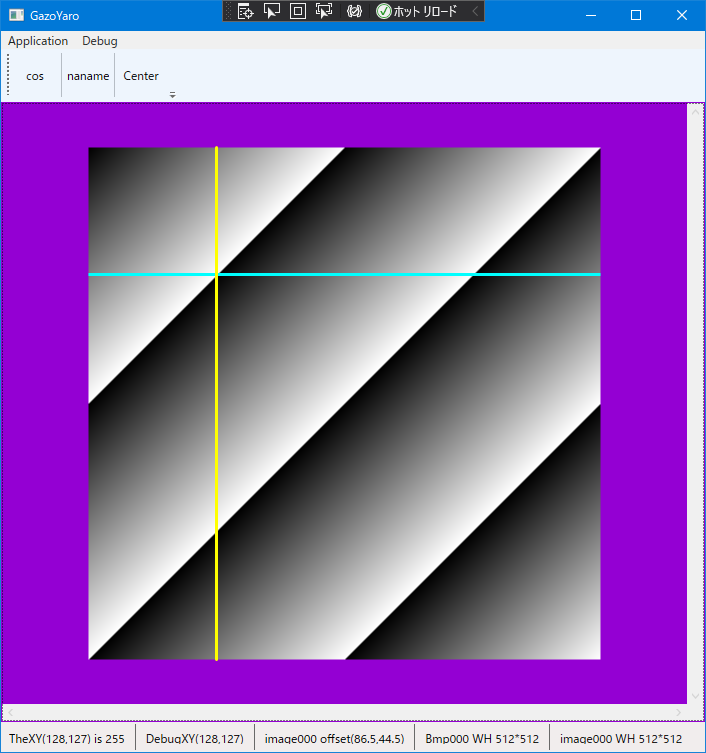
ツールボタンの cos を押すと、水平のコサイン波形と垂直のコサイン波形を加算したものを格納します。また、Center のボタンを押すと、画像センターに十字線が移動します。
ここまでくると、クリックした十字線における水平垂直の濃度プロファイルを表示したくなってきましたね。これを実現する方法は、また別の記事で紹介します。