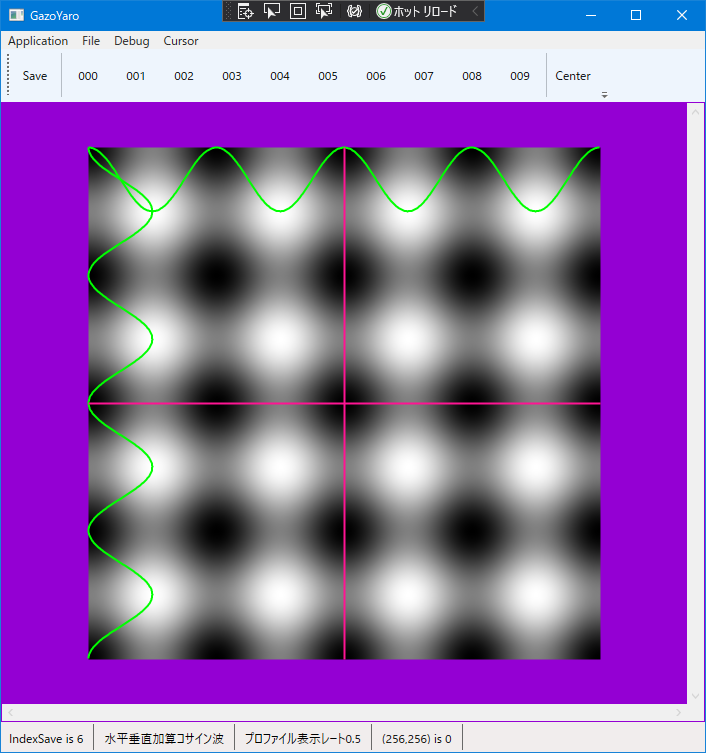
画像をクリックした場所に十字線を描画し濃度プロファイル波形を表示する
画像処理を扱うプログラムでは、濃度プロファイル波形を確認する機能は必須です。この機能がないと画像の大域に緩い濃度グラデーションや、インパルス的な濃度変化を、客観的に評価することができません。

以降、実際のコードを示して解説します。ソースコードが長いので、おのずと結構ながい記事になってしまいました。手っ取り早く結果だけ知りたいということであれば、この記事の最後にサンプルソースのダウンロードを示しておりますので入手してビルド実行してみてください。
MainWindow.xaml で Line を2アイテム定義します。これに水平線と垂直線を担当させます。これらでマウスクリックした場所の十字線を構成します。( MainWindow.xaml の 79, 80行目 )
また、Polyline を2アイテム定義します。これらに、十字線の位置の水平濃度断面の波形、垂直濃度断面の波形の表示を担当させます。( 同じくMainWindow.xaml の 81, 82行目 )
<Window x:Class="aaa.MainWindow"
        xmlns="http://schemas.microsoft.com/winfx/2006/xaml/presentation"
        xmlns:x="http://schemas.microsoft.com/winfx/2006/xaml"
        xmlns:d="http://schemas.microsoft.com/expression/blend/2008"
        xmlns:mc="http://schemas.openxmlformats.org/markup-compatibility/2006"
        xmlns:local="clr-namespace:aaa"
        mc:Ignorable="d"
        Title="MainWindow"  Width="720" Height="760">

    <DockPanel>

        <Menu DockPanel.Dock="Top">

            <MenuItem x:Name="menuApplication" Header="Application">
                <MenuItem x:Name="menuApplicationQuit" Header="Quit" Click="menuApplicationQuit_Click"/>
            </MenuItem>

            <MenuItem x:Name="menuFile" Header="File">
                <MenuItem x:Name="menuFileSave" Header="Save" Click="menuFileSave_Click"/>
            </MenuItem>

            <MenuItem x:Name="menuDebug" Header="Debug">
                <MenuItem x:Name="menuDebugExec000" Header="Exec000" Click="menuDebugExec000_Click" />
                <MenuItem x:Name="menuDebugExec001" Header="Exec001" Click="menuDebugExec001_Click" />
                <MenuItem x:Name="menuDebugExec002" Header="Exec002" Click="menuDebugExec002_Click" />
                <MenuItem x:Name="menuDebugExec003" Header="Exec003" Click="menuDebugExec003_Click" />
                <MenuItem x:Name="menuDebugExec004" Header="Exec004" Click="menuDebugExec004_Click" />
                <MenuItem x:Name="menuDebugExec005" Header="Exec005" Click="menuDebugExec005_Click" />
                <MenuItem x:Name="menuDebugExec006" Header="Exec006" Click="menuDebugExec006_Click" />
                <MenuItem x:Name="menuDebugExec007" Header="Exec007" Click="menuDebugExec007_Click" />
                <MenuItem x:Name="menuDebugExec008" Header="Exec008" Click="menuDebugExec008_Click" />
                <MenuItem x:Name="menuDebugExec009" Header="Exec009" Click="menuDebugExec009_Click" />
            </MenuItem>

            <MenuItem x:Name="menuCursor" Header="Cursor">
                <MenuItem x:Name="menuCursorMoveToCenter" Header="MoveToCenter" Click="menuCursorMoveToCenter_Click" />
            </MenuItem>

        </Menu>

        <ToolBarTray DockPanel.Dock="Top">
            <ToolBar>
                <Button x:Name="tbnFileSave" Content="Save" Width ="48" Height="48" Click="menuFileSave_Click"></Button>
                <Separator/>
                <Button x:Name="tbnDebugExec000" Content="000" Width ="48" Height="48" Click="menuDebugExec000_Click"></Button>
                <Button x:Name="tbnDebugExec001" Content="001" Width ="48" Height="48" Click="menuDebugExec001_Click"></Button>
                <Button x:Name="tbnDebugExec002" Content="002" Width ="48" Height="48" Click="menuDebugExec002_Click"></Button>
                <Button x:Name="tbnDebugExec003" Content="003" Width ="48" Height="48" Click="menuDebugExec003_Click"></Button>
                <Button x:Name="tbnDebugExec004" Content="004" Width ="48" Height="48" Click="menuDebugExec004_Click"></Button>
                <Button x:Name="tbnDebugExec005" Content="005" Width ="48" Height="48" Click="menuDebugExec005_Click"></Button>
                <Button x:Name="tbnDebugExec006" Content="006" Width ="48" Height="48" Click="menuDebugExec006_Click"></Button>
                <Button x:Name="tbnDebugExec007" Content="007" Width ="48" Height="48" Click="menuDebugExec007_Click"></Button>
                <Button x:Name="tbnDebugExec008" Content="008" Width ="48" Height="48" Click="menuDebugExec008_Click"></Button>
                <Button x:Name="tbnDebugExec009" Content="009" Width ="48" Height="48" Click="menuDebugExec009_Click"></Button>
                <Separator/>
                <Button x:Name="tbnCursorMoveToCenter" Content="Center" Width ="48" Height="48" Click="menuCursorMoveToCenter_Click"></Button>
            </ToolBar>
        </ToolBarTray>

        <StatusBar DockPanel.Dock="Bottom" Height="30">
            <Label Name="stbLabel000"/>
            <Separator/>
            <Label Name="stbLabel001"/>
            <Separator/>
            <Label Name="stbLabel002"/>
            <Separator/>
            <Label Name="stbLabel003"/>
            <Separator/>
            <Label Name="stbLabel004"/>
        </StatusBar>

        <Border BorderBrush="DarkViolet" BorderThickness="1" >
            <ScrollViewer Name="scv000" Background="DarkViolet" ScrollViewer.HorizontalScrollBarVisibility="Visible" ScrollViewer.VerticalScrollBarVisibility="Visible">
                <Grid x:Name="grid000" MouseDown="OnMouseDown" MouseMove="OnMouseMove">

                    <Image x:Name="image000" Stretch="Uniform"/>

                    <Canvas x:Name="canvas000" Background="Transparent">
                        <Polyline x:Name="polyline_profile_horz" Stroke="Lime" StrokeThickness="2"/>
                        <Polyline x:Name="polyline_profile_vert" Stroke="Lime" StrokeThickness="2"/>
                        <Line x:Name="cross_hair_horz" Stroke="DeepPink" StrokeThickness="2"/>
                        <Line x:Name="cross_hair_vert" Stroke="DeepPink" StrokeThickness="2"/>
                    </Canvas>

                </Grid>
            </ScrollViewer>
        </Border>

    </DockPanel>


</Window>
次に、MainWindow.xaml.cs のコードについて解説します。
画像の濃度プロファイル取得と描画は 110行目の OnRender() の中で実施します。
濃度プロファイルのデータ取得は 134, 140行目で実施します。
その濃度プロファイルを描画座標として Polyline に反映させるために配列コレクションに渡します。これが174, 184行目にあたります。
画像はウインドウのどこに表示されるかは、実行時に決定されます。148行目の TranslatePoint() で、画像の左上隅の座標が取得できます。これを考慮して 前述した 174, 184行目のループブロックでオフセット量をしこんでおきます。
そうして出来上がったプロット座標の配列コレクションを使って水平波形と垂直波形のための Polyline に反映させます。これが 195, 196 行目です。
十字線を先に描画するか、水平垂直波形を先に描画するかは、OnRender() の実行コード順で決定されるわけではありません。
この描画順序(Zオーダ)は XAML 側で決定されますので、それぞれのアプリケーションに応じて順序を決定してください。
下記の MainWindow.xaml.cs において、下記のライブラリの追加をお忘れなく.
using System.Windows.Media.Imaging;
using System.IO;
using Microsoft.Win32;
using System;
using System.Collections.Generic;
using System.Linq;
using System.Text;
using System.Threading.Tasks;
using System.Windows;
using System.Windows.Controls;
using System.Windows.Data;
using System.Windows.Documents;
using System.Windows.Input;
using System.Windows.Navigation;
using System.Windows.Shapes;
using System.Windows.Media;

// これの追加を忘れないように. Don't forget to add this sentence.
using System.Windows.Media.Imaging;
using System.IO;
using Microsoft.Win32;

namespace aaa
{

	public partial class MainWindow : Window
	{

		const int INI_W = 512;
		const int INI_H = 512;

		const double DPI_X = 96.0;
		const double DPI_Y = 96.0;

		byte [] Data000;
		WriteableBitmap Bmp000;

		const int NUM_ELEMENT_OF_PAL = 256;

		int IndexSave = 0;
		List<String> ListKind;

		int TheX;
		int TheY;
		byte TheLevel;

		// 濃度プロファイルの表示係数.
		double ProfileZoomRate = 0.5;

		public MainWindow()
		{

			ApplicationUtility apu = new ApplicationUtility();

			// これはデフォルトのコード.
			InitializeComponent();

			// 画像の種類をリストする.
			ListKind = new List<String>(0);

			ListKind.Add( "固定値" );
			ListKind.Add( "水平ノコギリ波" );
			ListKind.Add( "垂直ノコギリ波" );
			ListKind.Add( "ななめノコギリ波" );
			ListKind.Add( "水平コサイン波" );
			ListKind.Add( "垂直コサイン波" );
			ListKind.Add( "水平垂直加算コサイン波" );
			ListKind.Add( "水平グラデーション" );
			ListKind.Add( "垂直グラデーション" );
			ListKind.Add( "ななめグラデーション" );

			// データ領域を確保する.
			int w = INI_W;
			int h = INI_H;
			int numpix = w * h;
			Data000 = new byte[ numpix ];

			// 確保した領域にデータを仕込む.
			IndexSave = 0;
			byte level = 0x80;
			apu.GetDataFill( Data000, w, h, level );

			// 8bppのビットマップを作るので256要素カラーパレットを作る.
			List<Color> list_color = new List<Color>(0);
			for ( int k = 0; k < NUM_ELEMENT_OF_PAL; k++ )
			{
				const byte LEVEL_ALPHA = 0xff;
				byte value = ( byte )(k);
				list_color.Add( Color.FromArgb( LEVEL_ALPHA, value, value, value ) );
			}

			// 8bppのビットマップを生成する.
			PixelFormat pixfmt = PixelFormats.Indexed8;
			BitmapPalette palette = new BitmapPalette( list_color );
			Bmp000 = new WriteableBitmap( w, h, DPI_X, DPI_Y, pixfmt, palette );

			// 画像出力先のサイズを決定する.
			image000.Width = Bmp000.PixelWidth;
			image000.Height = Bmp000.PixelHeight;

			// 画像出力先にビットマップを関係づける.
			image000.Source = Bmp000;

			// 十字カーソルは真ん中に出現.
			TheX = w >> 1;
			TheY = h >> 1;

			// ウインドウのタイトル.
			this.Title = "GazoYaro";

		}

		protected override void OnRender( DrawingContext dc )
		{

			// 画像のサイズを取得する.
			int w = Bmp000.PixelWidth;
			int h = Bmp000.PixelHeight;

			// ビットマップに画像データを書き込む.
			Int32Rect rct = new Int32Rect( 0, 0, w, h );
			int stride_bytes = w * sizeof( byte );
			int offset_bytes = 0;
			Bmp000.WritePixels( rct, Data000, stride_bytes, offset_bytes );

			int adrs;

			// カーソル位置の濃度を取得する.
			adrs = ( TheX + ( w * TheY ));
			TheLevel = Data000[ adrs ];

			// 水平と垂直の濃度プロファイルデータ領域を確保する.
			int [] profile_horz = new int[ w ];
			int [] profile_vert = new int[ h ];

			// 水平の濃度プロファイルデータを取得する.
			for ( int i = 0; i < w; i++ )
			{
				adrs = ( i + ( w * TheY ));
				profile_horz[i] = Data000[ adrs ];
			}

			// 垂直の濃度プロファイルデータを取得する.
			for ( int j = 0; j < h; j++ )
			{
				adrs = ( TheX + ( w * j ));
				profile_vert[j] = Data000[ adrs ];
			}

			// 親要素 Grid000 の座標系から image000 のオフセット量を取得する.
			Point img_point = image000.TranslatePoint( new Point( 0, 0 ), grid000 );
			double plot_offset_x = img_point.X;
			double plot_offset_y = img_point.Y;

			// Canvas の座標系は Grid の座標系と同じ.
			double plot_x = (double)( TheX + plot_offset_x );
			double plot_y = (double)( TheY + plot_offset_y );

			// 出力コントロール image000 のサイズを取得する.
			double img_w = image000.Width;
			double img_h = image000.Height;

			// 水平線を引く(十字線の横).
			cross_hair_vert.X1 = plot_x;
			cross_hair_vert.Y1 = plot_offset_y;
			cross_hair_vert.X2 = plot_x;
			cross_hair_vert.Y2 = plot_offset_y + img_h;

			// 垂直線を引く(十字線の縦).
			cross_hair_horz.X1 = plot_offset_x;
			cross_hair_horz.Y1 = plot_y;
			cross_hair_horz.X2 = plot_offset_x + img_w;
			cross_hair_horz.Y2 = plot_y;

			// 水平濃度プロファイル用のポリラインの頂点配列を作成する.
			PointCollection points_horz = new PointCollection();
			for ( int i = 0; i < w; i++ )
			{
				int level = profile_horz[i];
				double x = i + plot_offset_x;
				double y = ( level * ProfileZoomRate ) + plot_offset_y;
				Point pnt = new Point( x, y );
				points_horz.Add( pnt );
			}

			// 垂直濃度プロファイル用のポリラインの頂点配列を作成する.
			PointCollection points_vert = new PointCollection();
			for ( int j = 0; j < h; j++ )
			{
				int level = profile_vert[j];
				double x = ( level * ProfileZoomRate ) + plot_offset_x;
				double y = j + plot_offset_y;
				Point pnt = new Point( x, y );
				points_vert.Add( pnt );
			}

			// ポリラインを描画する.
			polyline_profile_horz.Points = points_horz;
			polyline_profile_vert.Points = points_vert;

			// ステータスバーのラベルに座標を表示する.
			String str000 = String.Format( "IndexSave is {0}", IndexSave );
			String str001 = ListKind[ IndexSave ];
			String str002 = String.Format( "プロファイル表示レート{0:f1}", ProfileZoomRate );
			String str003 = String.Format( "({0},{1}) is {2}", TheX, TheY, TheLevel );
			String str004 = "";
			stbLabel000.Content = str000;
			stbLabel001.Content = str001;
			stbLabel002.Content = str002;
			stbLabel003.Content = str003;
			stbLabel004.Content = str004;

		}

		private void OnMouseDown(object sender, MouseEventArgs e)
		{

			// 画像のサイズを取得する.
			int w = (int)( Math.Round( image000.Width ) );
			int h = (int)( Math.Round( image000.Height ) );

			// 親要素 Grid000 の座標系から image000 のオフセット量を取得する.
			Point pnt = e.GetPosition( image000 );

			int tmp_x = (int)( Math.Round( pnt.X ) );
			int tmp_y = (int)( Math.Round( pnt.Y ) );

			// クリックした座標が画像からはみ出ないようにする.
			if ( tmp_x < 0 ) { tmp_x = 0; }
			if ( tmp_y < 0 ) { tmp_y = 0; }
			if ( tmp_x >= w ) { tmp_x = w - 1; }
			if ( tmp_y >= h ) { tmp_y = h - 1; }

			// ここで代入される値は画像領域の内側であることが保証される.
			TheX = tmp_x;
			TheY = tmp_y;

			// 再描画をうながす、OnRender() が呼ばれる.
			this.InvalidateVisual();

		}

		private void OnMouseMove(object sender, MouseEventArgs e)
		{

			// 左ボタンが押し下げられているかどうか.
			if (( e.LeftButton & MouseButtonState.Pressed ) == MouseButtonState.Pressed )
			{
				// 押し下げられていたら OnMouseDown を実行する.
				this.OnMouseDown( sender, e );
			}

		}

		private void menuDebugExec000_Click( object sender, RoutedEventArgs e )
		{

			IndexSave = 0;

			ApplicationUtility apu = new ApplicationUtility();

			int w = Bmp000.PixelWidth;
			int h = Bmp000.PixelHeight;

			byte level = 0x80;
			apu.GetDataFill( Data000, w, h, level );

			this.InvalidateVisual();

		}

		private void menuDebugExec001_Click( object sender, RoutedEventArgs e )
		{

			IndexSave = 1;

			ApplicationUtility apu = new ApplicationUtility();

			int w = Bmp000.PixelWidth;
			int h = Bmp000.PixelHeight;

			apu.GetDataSawtoothHorz( Data000, w, h );

			this.InvalidateVisual();

		}

		private void menuDebugExec002_Click( object sender, RoutedEventArgs e )
		{

			IndexSave = 2;

			ApplicationUtility apu = new ApplicationUtility();

			int w = Bmp000.PixelWidth;
			int h = Bmp000.PixelHeight;

			apu.GetDataSawtoothVert( Data000, w, h );

			this.InvalidateVisual();

		}

		private void menuDebugExec003_Click( object sender, RoutedEventArgs e )
		{

			IndexSave = 3;

			ApplicationUtility apu = new ApplicationUtility();

			int w = Bmp000.PixelWidth;
			int h = Bmp000.PixelHeight;

			apu.GetDataSawtoothNaname( Data000, w, h );

			this.InvalidateVisual();

		}

		private void menuDebugExec004_Click( object sender, RoutedEventArgs e )
		{

			IndexSave = 4;

			ApplicationUtility apu = new ApplicationUtility();

			int w = Bmp000.PixelWidth;
			int h = Bmp000.PixelHeight;
			double cycle = 4.0;
			apu.GetDataCosWaveHorz( Data000, w, h, cycle );

			this.InvalidateVisual();

		}

		private void menuDebugExec005_Click( object sender, RoutedEventArgs e )
		{

			IndexSave = 5;

			ApplicationUtility apu = new ApplicationUtility();

			int w = Bmp000.PixelWidth;
			int h = Bmp000.PixelHeight;
			double cycle = 4.0;
			apu.GetDataCosWaveVert( Data000, w, h, cycle );

			this.InvalidateVisual();

		}

		private void menuDebugExec006_Click( object sender, RoutedEventArgs e )
		{

			IndexSave = 6;

			ApplicationUtility apu = new ApplicationUtility();

			int w = Bmp000.PixelWidth;
			int h = Bmp000.PixelHeight;
			double cycle = 4.0;
			apu.GetDataCosWaveHorzVert( Data000, w, h, cycle );

			this.InvalidateVisual();

		}

		private void menuDebugExec007_Click( object sender, RoutedEventArgs e )
		{

			IndexSave = 7;

			ApplicationUtility apu = new ApplicationUtility();

			int w = Bmp000.PixelWidth;
			int h = Bmp000.PixelHeight;

			apu.GetDataGradHorz( Data000, w, h );

			this.InvalidateVisual();

		}

		private void menuDebugExec008_Click( object sender, RoutedEventArgs e )
		{

			IndexSave = 8;

			ApplicationUtility apu = new ApplicationUtility();

			int w = Bmp000.PixelWidth;
			int h = Bmp000.PixelHeight;

			apu.GetDataGradVert( Data000, w, h );

			this.InvalidateVisual();

		}

		private void menuDebugExec009_Click( object sender, RoutedEventArgs e )
		{

			IndexSave = 9;

			ApplicationUtility apu = new ApplicationUtility();

			int w = Bmp000.PixelWidth;
			int h = Bmp000.PixelHeight;

			apu.GetDataGradNaname( Data000, w, h );

			this.InvalidateVisual();

		}

		private void menuCursorMoveToCenter_Click( object sender, RoutedEventArgs e )
		{

			int w = Bmp000.PixelWidth;
			int h = Bmp000.PixelHeight;

			TheX = w >> 1;
			TheY = h >> 1;

			this.InvalidateVisual();

		}

		private void menuFileSave_Click( object sender, RoutedEventArgs e )
		{

			// デフォルトで表示するファイル名.
			String fnm_ini = String.Format( "img_{0:d3}", IndexSave );

			// ファイルダイアログを生成する.
			SaveFileDialog sfd = new SaveFileDialog();
			sfd.FileName = fnm_ini;
			sfd.Filter = "BMP|*.bmp|ALL|*.*";

			// ファイルダイアログを表示する.
			bool? ret = sfd.ShowDialog();
			if ( ret == false )
			{
				return; // warning.
			}

			// ---------------------------
			// ここからファイル保存 ------
			// ---------------------------

			String filepath = sfd.FileName;
			FileMode file_mode = FileMode.Create;
			FileAccess file_access = FileAccess.Write;

			using ( FileStream fs = new FileStream( filepath, file_mode, file_access ))
			{

				BmpBitmapEncoder enc_bmp = new BmpBitmapEncoder();

				BitmapFrame bmf = BitmapFrame.Create( Bmp000 );

				enc_bmp.Frames.Add( bmf );
				enc_bmp.Save( fs );

				fs.Close();

			}

		}

		private void menuApplicationQuit_Click( object sender, RoutedEventArgs e )
		{

			// ウインドウを閉じてアプリケーションを終了する.
			this.Close();

		}

	}
}
下記の ApplicationUtility.cs は、デバッグ用のデータを byte[] に格納するためのライブラリです。必要に応じてご利用ください。
using System;
using System.Collections.Generic;
using System.Linq;
using System.Text;
using System.Threading.Tasks;

namespace aaa
{

	public class ApplicationUtility
	{

		public ApplicationUtility()
		{

		}

		// べったり同じ色のデータの画像を取得する.
		public bool GetDataFill( byte [] data, int width, int height, byte level )
		{

			int w = width;
			int h = height;
			int numpix = w * h;

			int adrs = 0;

			for ( int n = 0; n < numpix; n++ )
			{
				data[adrs] = level;
				adrs++;
			}

			return true;

		}

		// 水平ノコギリ波の画像を取得する.
		public bool GetDataSawtoothHorz( byte [] data, int width, int height )
		{

			int w = width;
			int h = height;

			byte level;

			int adrs;

			for ( int j = 0; j < h; j++ )
			{

				level = (byte)(j);
				adrs = w * j;

				for ( int i = 0; i < w; i++ )
				{
					data[ adrs ] = level;
					adrs++;
				}

			}

			return true;

		}

		// 垂直ノコギリ波の画像を取得する.
		public bool GetDataSawtoothVert( byte [] data, int width, int height )
		{

			int w = width;
			int h = height;

			byte level;

			int skip = w;
			int adrs;

			for ( int i = 0; i < w; i++ )
			{

				level = (byte)(i);
				adrs = i;

				for ( int j = 0; j < h; j++ )
				{
					data[ adrs ] = level;
					adrs += skip;
				}

			}

			return true;

		}

		// ななめノコギリ波の画像を取得する.
		public bool GetDataSawtoothNaname( byte [] data, int width, int height )
		{

			int w = width;
			int h = height;
			byte level;

			for ( int j = 0; j < h; j++ )
			{
				for ( int i = 0; i < w; i++ )
				{
					level = (byte)( i + j );
					data[ i + w  * j ] = level;
				}
			}

			return true;

		}

		// 水平コサインデータの画像を取得する.
		public bool GetDataCosWaveHorz( byte [] data, int width, int height, double cycle )
		{

			int w = width;
			int h = height;

			double two_pai = 2.0 * Math.PI;
			double rate;
			double rad;

			double tmp0;
			double tmp1;
			byte level;

			byte [] table = new byte[ h ];

			const double OFFSET = 1.0;
			const double MUL = 0.5;

			// テーブルを作る.
			for ( int j = 0; j < h; j++ )
			{
				// ラジアンを算出する.
				rate = (double)(j)/(double)( h - 1 );
				rad = rate * two_pai;

				// ここでコサインの計算をする.
				tmp0 = -( Math.Cos( cycle * rad ));

				// 0.0 から 1.0 が存在範囲.
				tmp1 = (( tmp0 + OFFSET ) * MUL );

				// 0 から 255 にキャストする.
				level = (byte)( Math.Round( tmp1 * 255.0 ));
				table[j] = level;
			}

			int adrs;

			// 水平の cos 波形2D, ( 0 から 1.0 ).
			for ( int j = 0; j < h; j++ )
			{

				level = table[j];
				adrs = w * j;

				for ( int i = 0; i < w; i++ )
				{
					data[ adrs ] = level;
					adrs++;
				}

			}

			return true;

		}

		// 垂直コサインデータの画像を取得する.
		public bool GetDataCosWaveVert( byte [] data, int width, int height, double cycle )
		{

			int w = width;
			int h = height;

			double two_pai = 2.0 * Math.PI;
			double rate;
			double rad;

			double tmp0;
			double tmp1;
			byte level;

			byte [] table = new byte[ w ];

			const double OFFSET = 1.0;
			const double MUL = 0.5;

			// テーブルを作る.
			for ( int i = 0; i < w; i++ )
			{
				// ラジアンを算出する.
				rate = (double)(i)/(double)( w - 1 );
				rad = rate * two_pai;

				// ここでコサインの計算をする.
				tmp0 = -( Math.Cos( cycle * rad ));

				// 0.0 から 1.0 が存在範囲.
				tmp1 = (( tmp0 + OFFSET ) * MUL );

				// 0 から 255 にキャストする.
				level = (byte)( Math.Round( tmp1 * 255.0 ));
				table[i] = level;
			}

			int adrs;

			// 垂直の cos 波形2D, ( 0 から 1.0 ).
			for ( int j = 0; j < h; j++ )
			{
				adrs = w * j;
				for ( int i = 0; i < w; i++ )
				{
					data[ adrs ] = table[i];
					adrs++;
				}
			}

			return true;

		}

		// 水平垂直加算コサインデータの画像を取得する.
		public bool GetDataCosWaveHorzVert( byte [] data, int width, int height, double cycle )
		{

			int w = width;
			int h = height;

			double two_pai = 2.0 * Math.PI;
			double rate;
			double rad;

			double tmp;

			double [] table_for_a = new double[ h ];
			double [] table_for_b = new double[ w ];

			const double OFFSET = 1.0;
			const double MUL = 0.5;

			// テーブルを作る.
			for ( int j = 0; j < h; j++ )
			{
				// ラジアンを算出する.
				rate = (double)(j)/(double)( h - 1 );
				rad = rate * two_pai;

				// ここでコサインの計算をする.
				tmp = -( Math.Cos( cycle * rad ));

				// 0.0 から 1.0 が格納される.
				table_for_a[j] = (( tmp + OFFSET ) * MUL );
			}

			// テーブルを作る.
			for ( int i = 0; i < w; i++ )
			{
				// ラジアンを算出する.
				rate = (double)(i)/(double)( w - 1 );
				rad = rate * two_pai;

				// ここでコサインの計算をする.
				tmp = -( Math.Cos( cycle * rad ));

				// 0.0 から 1.0 が格納される.
				table_for_b[i] = (( tmp + OFFSET ) * MUL );
			}

			double a;
			double b;
			byte level;

			int adrs;

			for ( int j = 0; j < h; j++ )
			{

				// 0.0 から 1.0 の範囲をとる.
				a = table_for_a[j];

				adrs = w * j;

				for ( int i = 0; i < w; i++ )
				{
					// 0.0 から 1.0 の範囲をとる.
					b = table_for_b[i];

					// 両方を加算すると 0.0 から 2.0 の範囲をとる.
					tmp = a + b;

					// 0 から 255 の byte 区間にマッピングする.
					level = (byte)( Math.Round(( tmp * 0.5 ) * 255.0 ));

					// 8bits画像データとして格納する.
					data[ adrs ] = level;

					adrs++;

				}
			}

			return true;

		}

		// 水平グラデーションデータの画像を取得する.
		public bool GetDataGradHorz( byte [] data, int width, int height )
		{

			int w = width;
			int h = height;

			byte level;
			double rate;

			int adrs;

			for ( int j = 0; j < h; j++ )
			{

				rate = (double)(j)/(double)( h - 1 );
				level = (byte)( Math.Round( rate * 255.0 ));

				adrs = w * j;

				for ( int i = 0; i < w; i++ )
				{
					data[ adrs ] = level;
					adrs++;
				}

			}

			return true;

		}

		// 垂直グラデーションデータの画像を取得する.
		public bool GetDataGradVert( byte [] data, int width, int height )
		{

			int w = width;
			int h = height;

			byte level;
			double rate;

			int skip = w;
			int adrs;

			for ( int i = 0; i < w; i++ )
			{

				rate = (double)(i)/(double)( w - 1 );
				level = (byte)( Math.Round( rate * 255.0 ));

				adrs = i;

				for ( int j = 0; j < h; j++ )
				{
					data[ adrs ] = level;
					adrs += skip;
				}

			}

			return true;

		}

		// ななめグラデーションデータの画像を取得する.
		public bool GetDataGradNaname( byte [] data, int width, int height )
		{

			int w = width;
			int h = height;

			double value_i;
			double value_j;

			double rate_x;
			double rate_y;

			byte level;

			int adrs;

			for ( int j = 0; j < h; j++ )
			{

				rate_y = (double)(j)/(double)( h - 1 );
				value_j = ( rate_y * 127.0 );

				adrs = w * j;

				for ( int i = 0; i < w; i++ )
				{

					rate_x = (double)(i)/(double)( w - 1 );
					value_i = ( rate_x * 128.0 );

					level = (byte)( Math.Round( value_i + value_j ));

					data[ adrs ] = level;
					adrs++;

				}

			}

			return true;

		}

	}

}
本記事のコードは、3つのソースにわけて紹介しているので、コピーペーストでのビルドでは厳しいと思います。ぜひダウンロードして動作をご確認ください。
ソースコードだけですので、手持ちの VisualStudio でビルドしてから実行してください。

